Tuesday, November 25, 2008
Fun in the Mail and in the Air
Look what came in the mail. While reading Sarah Smith's blog, I saw that she was asking for volunteers to test her new product, a microfibre screen cloth. Just the day before I had been so frustrated by my dirty screen and had tried everything, including using the cloth that actually came with the computer. But there were still streaks everywhere. So when I saw Sarah's request, I quickly signed up and to my surprise they came in just a few days. Not only are they cute, but they did a great job, no streaks anywhere. In fact I was pretty ecstatic about it since last week's cleaning was such a failure. I showed my family and they immediately went about the house looking for "screens" to clean and were also impressed. Now they all want one of their own. Thanks Sarah. You definitely have a hit. I'll get the questionnaire back to you soon.
We're getting ready for the guests to arrive this week. We have 2 here already (college son and girlfriend-more on that later), but most of them don't get here until Wednesday, but that didn't stop Nikki from happily giving up her bed for the incoming cousins and setting up post on the pull out sofa. This is half the fun of family coming into town-stirring things up and changing things around in the house even if it's only for a couple of nights. There's a wonderful and undeniable magic in the air during the holidays especially for 7 year olds.
Friday, November 21, 2008
While the Mice are Away...
My DH is pulling a couple of night shifts, so I decided to take matter into my own hands and get one of my honey-do projects finished by myself. I've always thought that a couple shelves over my cutting board area would be very handy, so I put these up and I don't know why I waited so long. It was so easy, just pre-drilled the holes, centered the shelves much like putting a border on a quilt and then leveled it before making it permanent and it makes a huge difference in the room. I wish it was that easy leveling some of my quilts! I'm going to slowly work my way up the power tool ladder until I feel comfortable with a table saw. For some reason, they just scare me. Right now though I'll stick with the power drill, hammer and level and be happy.
I also put up this cute little sign above my window that my daughter made for me. Now back to finishing my quilts.
Thursday, November 20, 2008
It worked!
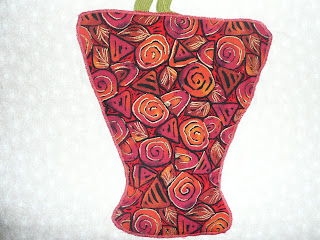
I took the words of advice from friends about how to machine applique and the advice worked. I guess I was using a cheap thread, actually it was just your average thread, Coats. But it kept breaking when I tried to applique with it. So I bought Gutterman thread and put it in the bobbin as well. For years I have had problems using the machine to do my applique and this worked like a charm. Here's the vase where I used a satin stitch and then a close up of the flowers where I experimented with a different stitch. I used #24 stitch on my Elna Heirloom Edition machine. For the leaves, I'll pick a different stitch too. I'm so happy it's working so well. It has opened up the applique world to me now. I'm already thinking about what I can do next.
Wednesday, November 19, 2008
lamp shade
I saw this lamp shade for sale and I loved it. I think I could easily make one pretty similar. Somewhere I've seen fabric that looks similar to this and that's what I like about this lampshade. I love the earthiness of it and I have a couple of pretty boring run-of-the-mill lampshades that I'd love to redo. If anyone knows where I can find fabric that looks similar to this, let me know.
Wednesday, November 12, 2008
Cottage Block Exchange
I got my Christmas Cottage Blocks! How exciting to get something like this in the mail. Thank you everyone for such beautiful work, they are all so unique and fun to look at, and especially to Nanette and Terri who coordinated the whole thing. You did a great job and thank you for the extra goodies you sent along. This was my first exchange and it went so smoothly. I'm up for another one now.
I haven't decided how I will put them together yet. Melissa at Cornbread and beans quilting gave me a good idea. She's making a 6-block wall hanging and using the other 3 to make a table runner. That's very tempting.
Here's a little peek at something I'm working on right now. I've got it on my design wall so I can stare at it for a while and figure out what will look best. I tried using a satin stitch (a tight zig zag) to stitch down the applique, but boy, my machine did not like that. The thread kept breaking and I'm not sure what was going on. I'm going to change to a higher quality thread and put a new needle on and see if that makes a difference. But if anyone has any suggestions, I'd love to hear them. For now it's safe and sound on the design wall.
Tuesday, November 11, 2008
Friendship block
In my quilt group, Material Girls, each month one of us brings a pattern for a block and sometimes they bring fabric swatches so we can make good matches and then we each make 1 or 2 blocks for that person. It's been so interesting to see which block we'll be doing each month and it forces us to put together patterns, fabrics and designs that a lot of times we would have never picked. Here is the friendship block this month that I just made for Jeanie. She gave us the center square and the 4 corner squares and then asked us to use red, white or black in the strips. I think it turned out darling and can't wait to see all the rest of the squares at our next meeting. It's my turn next month and I'm having a hard time coming up with an idea.
On another note, I saw this design for a wall hanging and since I'm a Bear scout den leader I thought maybe they could make something like this using straws and cutting them into various lengths. If I can find straws in Christmas colors (red, green, gold, silver) I thought it would make a cute wreath wall hanging. We'll see. It may be too labor intensive for 9 year olds, but I thought it was pretty and interesting.
Saturday, November 8, 2008
Out with the old...
I don't know what happened to my mind the other day while making a bias binding for my quilt. I couldn't find my little bias making tool, so I remembered from a quilt class years ago that if you pin into your ironing board with 2 pins, leaving the exact opening you want for the size bias you're making, you can just fold it and pull it through and iron it all in one smooth move. Well, it was going along swimmingly just as I had remembered until I lifted up my iron. What made me think I could leave my iron in the down position for such a long time (I made an extra long piece of binding) and not see any effects from it on the ironing board. My big board cover was burned (although I must say my binding turned out beautifully). Was this the price I had to pay? Not only was it burned, but the next day I must have still had a blank spot in my brain because as I began my new project and was ironing a pretty off white background piece I noticed the residue from the burn on the board was transferring to my white fabric. Ughh! Luckily it washed out. So this time I ironed it once more but on the other side of the ironing board this time. This other side only had a few heart shaped figures left over from an ambitious fusible webbing incident.
Then it dawned on me, make a new cover. My big ironing board is just a large rectangular piece of plywood on top of my regular ironing board and it has been wonderful. My first cover was just a gun metal grey color. I never really thought much of it. So first I looked through all my fabric that was at least 1 1/2 to 2 yards long (not many to choose from) and this is what I found. I quickly cut it to size, staple gunned it to the back leaving all the previous existing layers and look how great it looks now. I never thought I'd say this, but I actually enjoy looking at my ironing board every time I walk in the room now.
Wednesday, November 5, 2008
Snippets anyone?
I know this is an old book, but this is such a fun method. It's from Cindy Walter's book Snippet Sensations. This is quick and rewarding. It goes together very fast and if you like putting floral arrangements together, you'd probably do a much better job than me. Iron Steam-a-Seam onto the back of your fabric choices, then snip away and position onto a background. It has a light stickiness to it and it's repositionable. It will become permanent when you iron it to the background. Just machine quilt over the top of it. Tons of possibilities.
Tuesday, November 4, 2008
Oh to be 13 again!
My DD (in the green) got together with her friends at middle school and decided, planned, shopped and executed this year's Halloween costume. They went together as a rainbow. They looked darling as they traversed the streets of our neighborhood, skipping, chanting and singing as they went. So carefree, so innocent. Oh to be 13 again!
Subscribe to:
Posts (Atom)